Properly maintaining your heating and cooling equipment guarantees you clean indoor air, a prolonged lifespan for your HVAC system, lower energy expenses, and a cleaner unit overall. A major part of maintaining your system is regularly changing your HVAC filters.
Your HVAC system’s filters have numerous crucial roles that impact both the functioning of the system and indoor air purity. Learning more about the importance of these filters, what they do for your system, and the steps needed to replace them will ensure that you have all the info you need for proper HVAC maintenance.
HVAC Filters and Indoor Air Quality
The function of HVAC filters is to trap and hold dust, pollen, pet dander, and other allergens present in the circulating air within your home. This contributes to better indoor air quality, which can lead to a reduction in allergic reactions or respiratory issues like asthma. However, over time, these particles accumulate on the filter, increasing its propensity for bacteria growth. To maintain clean household surroundings while also protecting loved ones’ health, you must change filters frequently.
Ensuring HVAC Efficiency
Clogged and filthy air filters can impede the circulation of air in your home, resulting in a drop in efficiency and an increase in utility expenses for your HVAC system. According to Department of Energy estimates, uncleaned filters could increase energy consumption by as much as 15%. By replacing filters regularly, homeowners optimize airflow and allow their units to function at their optimum level while using the minimum necessary energy.
Extending Equipment Lifespan
If your air filters are becoming dirty, it puts extra strain on your system to get the airflow moving; HVAC system motors must run longer to maintain temperature settings. Additional stress and strain on internal components can seriously shorten an air conditioner’s or heater’s lifespan. Clean filters reduce pressure on the system, allowing it to operate as intended. Proper maintenance through regular filter changes can add years to equipment life.
Minimizing Repair Costs
Dust built up on dirty filters can flake off and accumulate inside ductwork and components over time. It leads to more frequent repairs from internal corrosion or blocked airflow. By replacing filters before they become severely clogged, you prevent this kind of damage from occurring. The savings on maintenance and repairs far outweigh the low cost of quality air filters.
Improving Overall Comfort
Beyond performance impacts, dirty filters can also make your home less comfortable. Clogged filters block optimal airflow throughout rooms. When indoor air feels stagnant, air quality seems poorer as well. Clean filters maximize air circulation for a fresh, healthy indoor environment.
Steps for Replacing Your HVAC Filters
While you should rely on professionals for the maintenance of your HVAC system, there are certain tasks you will need to do yourself in between maintenance visits. This includes replacing air filters. Failing to install the filters correctly could lead to serious issues for your HVAC system, so it’s important to follow a few steps to ensure safety and proper replacement.
Turn Off The HVAC System
To begin, locate the thermostat that controls the HVAC system. Switch it to the “off” position. This ensures the system does not try to engage while you are working on it. If the unit has a dedicated power switch, flip that off as well. Then, proceed to the air handler or furnace unit and switch off the power supply breaker at the main electrical panel.
Locate Filters
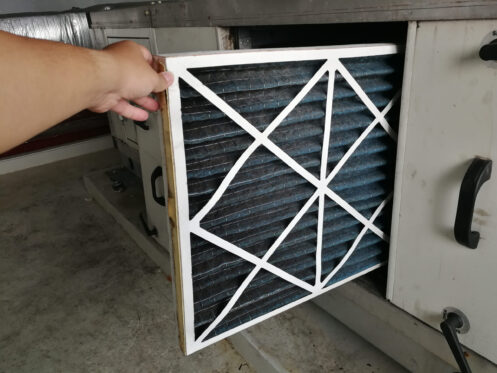
HVAC filters can be found in various locations within your home, depending on the type of system you have. For central air systems, filters are usually located near the air handler unit, which might be in your attic, basement, garage, or utility closet. The filter may be housed within a metal panel on the side of the unit; this panel often has a handle and can be opened without tools. For systems with external intake vents, filters can also be located behind the vent covers on walls or ceilings.
When locating filters in a central system, check for an access panel or slot labeled ‘Filter’ or something similar. This panel might slide or swing open to reveal the filter slot. In multi-zone systems, there might be several filters to locate, corresponding to different areas of your home. If your system accommodates multiple filters, note the quantity and sizes needed for replacement to ensure you purchase the correct filters for each zone or unit.
Confirm New Filter Sizes
Before installing new filters, verify their sizes to ensure a perfect match with your system’s requirements. Common sizes are 16x25x1 and 20x25x1, among others, but it’s crucial that the new filters match exactly to avoid airflow problems. Before unwrapping, compare the new filters’ dimensions against those required by your system to confirm a correct fit. Handling filters by their cardboard edges can prevent damage to the filtering material.
Insert New Filters Correctly
Prepare the new filter by ensuring it’s fully expanded and the edges are smooth for insertion. Grasping the filter by its sturdy frame, slide it gently into the designated track, ensuring the direction of airflow matches the arrow on the filter’s frame, pointing toward the HVAC system’s blower.
If your system requires multiple filters, insert each one following the same procedure, checking for a snug fit without forcing or bending the filter. Ensure all filters are seated correctly, with even spacing and stability, to facilitate efficient airflow and filtration.
Reassemble and Secure Access Panels
After all filters are securely in place, reattach any access panels or covers. Ensure they’re properly aligned and secure them with the original screws or fasteners. Tighten them to a snug fit without overcompressing any sealing elements, which might affect the system’s efficiency by allowing unfiltered air to pass through. A final wipe of the exterior with a clean cloth can remove any fingerprints or dust accumulated during the process, keeping your system looking as well-maintained as it operates.
Reactivate the HVAC System
With maintenance complete, return to the thermostat to reactivate the system. If it was turned off, switch it back on, ensuring all previous settings are preserved or reset as needed. Choose the appropriate heating or cooling mode to start airflow. Observe the system briefly to ensure air distribution resumes smoothly and without issue.
Finally, restore power at the main electrical panel if it was disconnected, completing your HVAC maintenance. Regular filter changes, typically recommended every three months depending on usage and air quality, keep your system running efficiently and your home’s air clean.
Your Local HVAC Pros
Our team at [company_name] provides comprehensive HVAC services to keep your system running smoothly all season long. In addition to filter replacement and maintenance, we can inspect units, replace faulty parts, perform safety checks, install new units, and more. We also offer a full range of plumbing and electrical services in Jerome and the surrounding area. Our experts are ready to ensure your home’s indoor environment stays comfortable and clean all year round. Contact us today to schedule your next HVAC service appointment.